Microsoft Storage Spaces Direct Calculator Eases Volume PlanningMicrosoft Storage Spaces Direct Calculator Eases Volume Planning
The new Storage Spaces Direct calculator for Windows 2016 makes it easier to assess requirements, resiliency and usable space.
November 11, 2019

One of the most highly anticipated features in Windows Server 2016 was Storage Spaces Direct. Storage Spaces Direct – also known as S2D – allows admins to create scalable and highly available software-defined storage using only the internal storage found within a series of cluster nodes. Storage Spaces Direct is surprisingly easy to set up and can be deployed by issuing just a few simple PowerShell commands.
Even so, planning for a Storage Spaces Direct deployment can be somewhat difficult. For example, administrators must ensure that the servers within the Storage Spaces Direct cluster meet the underlying hardware requirements, and additional planning is required prior to creating the actual volumes. Fortunately, Microsoft has made available a new calculator for smoothing the path to Storage Spaces Direct deployment.
Storage Spaces Direct is designed to utilize a cluster of Windows servers running Windows Server 2016 or higher. Although not a rigid requirement, Microsoft recommends that you use the same server make and model for each node in the cluster. These nodes must be equipped with either an Intel Nehalem (or later) or an AMD EPYC (or later) CPU. In addition to the RAM required by the servers’ operating system and workload, the servers will require an additional 4 GB of RAM for every 4 TB of cache drive capacity. You can review the full list of hardware requirements here.
A big part of the planning process is figuring out what volume configuration you want to use. Windows Server 2016-based clusters can accommodate up to 32 volumes. This limit was doubled in Windows Server 2019, which supports up to 64 volumes. Microsoft recommends that volumes be configured to use the ReFS file system unless you require features that are not yet supported by ReFS.
One of the most critical aspects of the planning process is determining what level of resiliency should be used to protect the data within the cluster. Your choice will determine how well your data is protected and how much usable storage space will exist within the volume.
If your cluster contains two servers, then your only option is to use mirroring (unless you opt for nested resiliency). If your cluster contains three nodes, Microsoft recommends that you use three-way mirroring. For servers with four or more nodes, you can use three-way mirroring, dual parity (erasure coding) or mirror accelerated parity.
Because of the complexity of planning for Storage Spaces Direct, Microsoft has recently created a Storage Spaces Direct Calculator. This Web-based calculator is currently in preview, which is Microsoft-speak for beta testing, but it seems to work the way that it is supposed to.
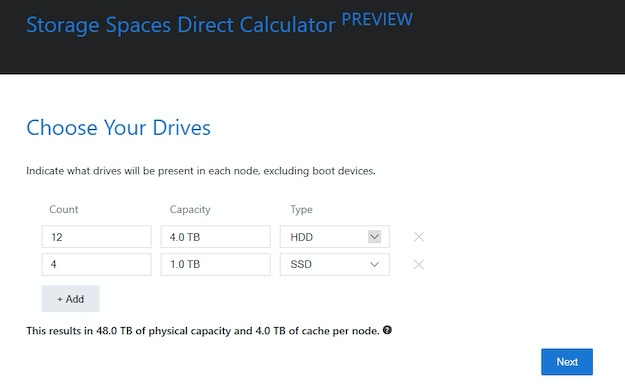
The first step in using the calculator is to specify the storage hardware that exists in each node. For each type of storage, you will need to list the number of disks that are present, the disk capacity and the disk type (NVMe, HDD or SSD).
The next step in the process is to select the number of nodes that you initially plan to include in the Storage Spaces Direct cluster, as shown in Figure 1. The cluster must include at least two nodes, but it can contain as many as 16. It is also worth noting that if your cluster initially includes fewer than 16 nodes, you can scale the cluster later on by adding more nodes.

S2D Planning 1
Figure 1
Enter the node storage configuration and then specify the number of nodes that you wish to include in the cluster.
The next step in the process is to specify the degree of resiliency that you wish to have in place within the cluster. The setting that you choose has a direct impact on the amount of usable storage space that will be available within the cluster. The Storage Spaces Direct calculator actually tells you which types of resiliency you are able to use based on your cluster configuration. Of course, the really nice thing about the calculator is that it allows you to experiment with various resiliency and storage configuration options before you commit to using them.
Once you have chosen your resiliency level, take a look at the Results section, which you can see in Figure 2. This section lets you see how much usable space will be available within the cluster, and how much space is being lost to resiliency and to cluster overhead.

S2D Planning 2
Figure 2
Your resiliency choice impacts the amount of usable storage that will be available within the cluster.
About the Author
You May Also Like


